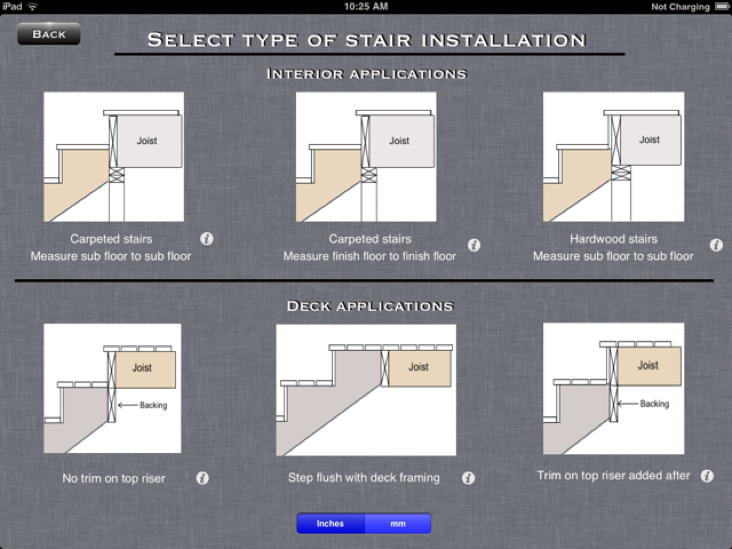
From the choices provided, select the proper installation method for your particular stairs.  The top three will be for interior applications and the bottom three will be for deck stairs.  Also select whether you will be working with inches or millimeters from this screen.


Carpeted stairs measuring from subfloor to subfloor


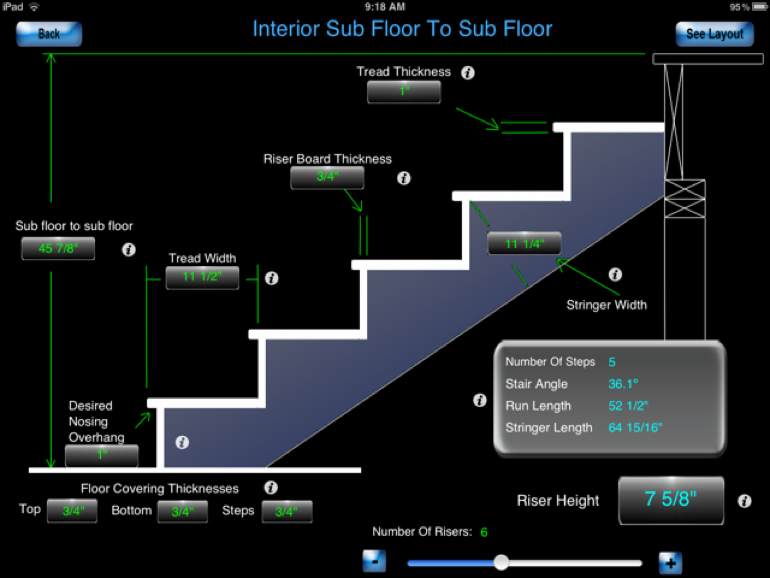
        Typically used for new construction, select this option when the floor coverings are not yet in place and measure from subfloor to subfloor. You will add the floor covering thicknesses when entering all of your dimensions.


Carpeted stairs measuring from finish floor to finish floor


        Select this option if the floor coverings are already in place.  This will be used in more of a remodel type situation.


Hardwood steps applied directly to the stringers measuring from subfloor to subfloor


        For hardwood stairs, select this option if you wish to install your hardwood treads and hardwood riser boards directly to the stringer.  Measure your height from subfloor to subfloor


Deck installation with stringer attached to finished face of deck


        Select this option if you will be fastening your stringer to the finished face of the deck wether directly to the rim joist or to a trim board already installed.  Depending upon the width of the joist, this method will probably require backing to fasten the stringer.


Deck installation with stringer flush with deck framing


        Select this option if you wish to fasten the stringer flush with the framing level of the deck


Deck installation with trim board on top riser


        Select this option if you will add a trim board to the rim joist after you have fastened the stringer to the deck.  Depending upon the width of the joist, this method will probably require backing to fasten the stringer

After selecting the installation method, you will be presented with a screen that looks like the one below.  From here you will enter all of the necessary measurements to lay out the stringer.  Tap the text box corresponding to the field you wish to enter.  Enter your floor covering thicknesses for the top floor, bottom floor and the steps on interior applications.  The app will use these numbers to calculate the proper layout. 


It is not necessary to hit the done button each time you enter a number...simply just tap the next field you wish to enter.  After you have entered all the necessary data, tap the done button to have the keypad slide away and then drag the ‘Number of Risers’ slider to calculate the riser height on the fly.  Stop when your riser height meets your desired result. This should be less that 7 3/4” or 198 mm to meet most building codes.  You can also tap the + or - button at either end of the slider to increment or decrement your number of risers by 1.


When you have reached your desired riser height, tap the see layout button to see your layout as shown below.  A text box will lead you through the steps at this point.  For advanced users, tap the ‘Show Entire Layout’ button to see all of your layout points at once, or if you wish you can step through the layout process by tapping the step button. The description in the text box will lead you through this process.  The board will scroll left or right so you can see all of the layout points and also the points will be shown in a list for quick reference.  After you have marked all the points on the board and connected the dots, you can cut your board and install your stringer. 

Glossary:


Joist -  the framing members use to support the floor or decking

Rim joist - A joist that caps the end of the floor joists

Stringer - the side of a staircase that supports the treads and risers

Tread - the horizontal surface of a step in a stair on which the foot is placed

Riser - the vertical section between the treads of a staircase

Subfloor - The rough floor beneath the finish floor

Use in conjunction with BalusterPro to layout your balusters
and check out TilePro for a new tile layout tool../BalusterPro/Home.htmlTileLayout.html../BalusterPro/Home.htmlshapeimage_3_link_0shapeimage_3_link_1